
ID Cards for Secure Facilities: A Practical Buying Guide

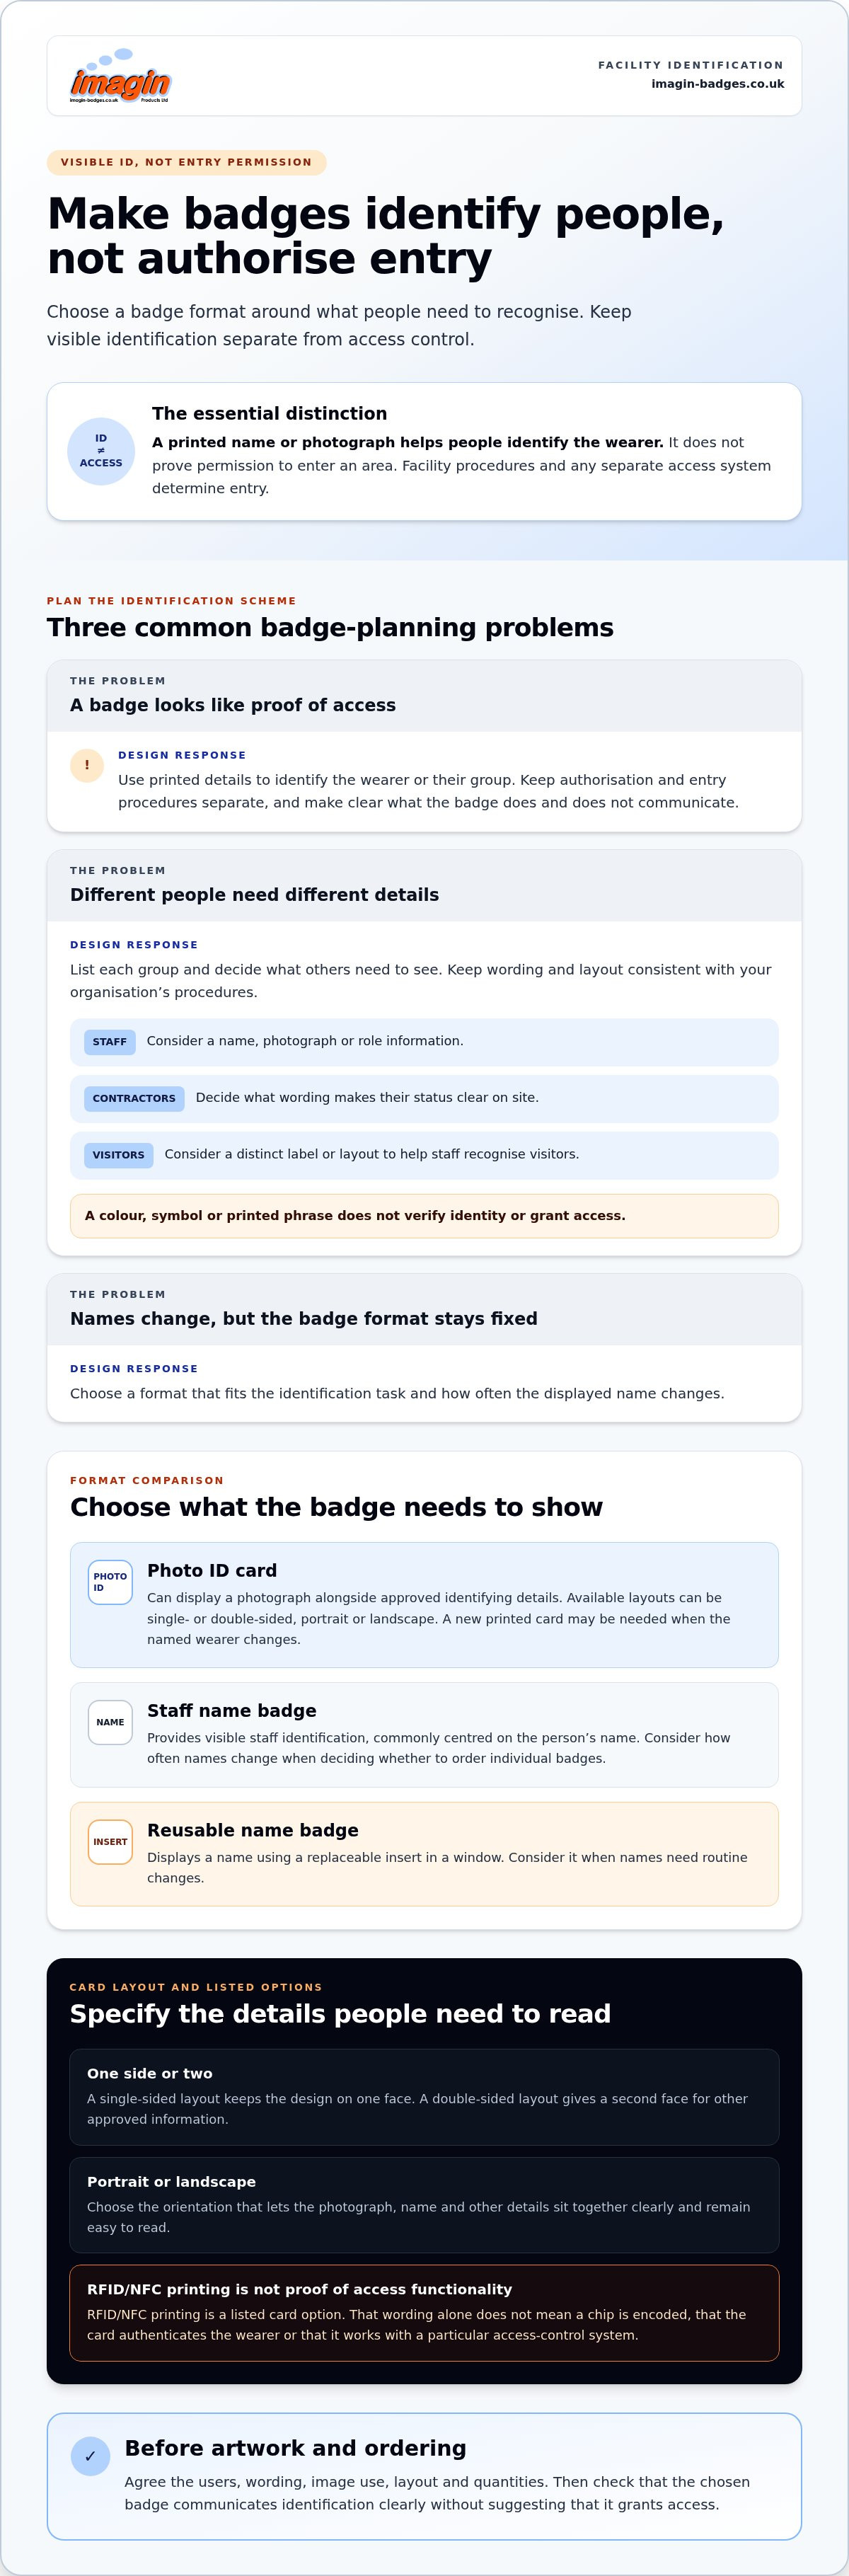
When choosing ID badges for secure facilities, keep visible identification separate from access control. A printed badge can help identify its wearer, but it shouldn’t imply that the person is authorised to enter a particular area.
The right format depends on who needs to wear the badge and what others need to see. A photo ID card can display a person’s image and details, while a name badge offers visible staff identification in a simpler format.
This guide compares those options and explains how to plan card layouts around your facility’s procedures. You’ll find practical points to consider when choosing single- or double-sided cards, portrait or landscape layouts, and a signature strip. RFID/NFC printing is also a listed card option, but printing alone doesn’t mean a card is encoded or works as an access-control credential. Treating those functions separately helps you specify badges without suggesting they provide security functions they don’t.
Key Takeaways
- Use ID badges for secure facilities as visible identification, not as proof that someone has permission to enter.
- Match photo ID cards, staff name badges and reusable badges to each group’s identification needs and how often names change.
- Choose card orientation, sides and printed details to suit the badge’s purpose, keeping facility procedures separate from card content.
- Agree users, wording, image use, layout and quantities before preparing artwork and placing an order.
- Compare available card layouts, including single- or double-sided formats, to plan a clear identification scheme.
What ID badges can do for a secure facility, and where their limits lie
An ID badge gives people a visible way to identify its wearer or the group they belong to while on site. A name, photograph or role label can help colleagues recognise staff, contractors, temporary workers and visitors, and follow the facility’s procedures for directing or assisting them. The badge supports those procedures, but it doesn’t replace them.
Visible identification shows who a person is; electronic access control determines whether a door grants entry. A printed badge alone doesn’t prove that its wearer has permission to enter a particular area. Make this distinction clear in the badge design and in the instructions given to people who use it.
Visible identification versus access credentials
A printed name or photograph is information for people to read. It shouldn’t be presented as evidence that a reader, lock or access system has authenticated the wearer. An identity document can take different forms, so define the practical purpose of your facility badge through your own procedures.
RFID/NFC printing is a listed option for Photo ID & Conference Cards. That wording alone doesn’t mean a chip is encoded, that a card performs authentication or that it works with a particular access-control system. Treat visible identification and electronic credentials as separate requirements. Before specifying artwork, decide what someone viewing the badge needs to identify, such as the wearer’s name, photograph or role.
Which people need identification in the facility?
List the groups who need to be recognisable, then decide what information is useful for each. Permanent staff may need a name and photograph for day-to-day identification. Contractors and temporary workers may need a clear role or group label, while wording on visitor badges can distinguish visitors from staff. These are design decisions, not substitutes for procedures that authorise or supervise people.
- Permanent staff: consider whether names, photographs or role information help colleagues identify them.
- Contractors and temporary workers: decide what wording makes their status clear to people on site.
- Visitors: consider whether a distinct label or layout helps staff recognise that they are visitors.
Keep role labels and layout differences simple and consistent with your organisation’s procedures. A colour, symbol or printed phrase doesn’t verify someone’s identity or grant access. If different groups need different information, record those requirements before ordering. That way each badge has a clear purpose without implying a security function it doesn’t provide.
Compare photo ID cards and name badges for secure facilities
Choose a format according to what someone needs to recognise at a glance and how often the displayed name will change. A photo ID card provides space for an image and other approved identification details. A staff name badge keeps the focus on a person’s name, while a reusable badge lets you change the displayed name using a replaceable insert.
| Format | Visible information | Layout flexibility | When names change |
|---|---|---|---|
| Photo ID card | Can display a photograph alongside the identifying details you approve. | Single- or double-sided, in portrait or landscape orientation. | A new printed card may be needed when the named wearer changes. |
| Staff name badge | Provides visible staff identification, commonly centred on the person’s name. | A straightforward format for a name and any other details included in the chosen design. | Consider how often names change when deciding whether to order individual badges. |
| Reusable name badge | Displays a name using a replaceable insert in a window. | The insert provides a practical way to update the displayed name. | Designed for situations where names need routine changes. |
None of these formats should be treated as an access-control solution. A badge’s appearance identifies its wearer or role; facility rules and any separate access system determine permission to enter. Align your identification policy with your access procedures so staff understand what a badge communicates and which separate process governs entry.
When a photo ID card suits the identification task
A photograph can help people compare the badge with its wearer. Your organisation can choose which additional details are useful for identification. A single-sided layout keeps the design on one face; a double-sided layout provides a second face for other approved information. Neither layout grants access.
Choose portrait or landscape according to how the photo, name and other details will sit together and remain easy to read. You can compare the options in our Photo ID Badges collection.
When a name badge or reusable badge may fit better
If staff mainly need to identify one another by name, a name badge offers a simpler visible format without a photograph. For a team where names change, a reusable name badge with a replaceable window insert lets you update the displayed name. Consider this option when you need a way to update names rather than ordering a new printed card for each change.
Choose according to the identification task, not an assumption that a more detailed card provides stronger access control. Consider whether a consistent name-only format or an updateable insert better suits your staff identification workflow.
Which card layout and printed details should you specify?
Start with the card’s purpose, then decide what needs to appear and how people will view it. A card intended to identify its wearer may need a photograph and approved details. Keep information that belongs in staff guidance, visitor procedures or access rules off the printed design unless there’s a clear reason to include it.
A clear card specification starts with its purpose, uses a layout that suits the content and keeps every printed detail readable. This gives your organisation a practical basis for choosing orientation, sides and artwork, without asking a printed card to carry more meaning than it should.
Choosing portrait, landscape and single- or double-sided layouts
Choose portrait or landscape orientation around the arrangement of the approved content and how the card will be displayed. Portrait can suit a vertical arrangement of a photo and name, while landscape offers a wider composition. Review the actual artwork rather than choosing a format by habit. Our Photo ID & Conference Cards are available in portrait and landscape formats, with single- and double-sided layout options.
Use a single-sided design if the required information fits clearly on one face. Choose double-sided printing when the approved design needs the reverse as well. A double-sided option with a signature strip is also listed. Include it only if your organisation has defined its purpose. Explore the Photo ID Badges collection to compare card formats.
Keep printed details purposeful and legible
Before artwork is prepared, agree which details are essential for identification. Consider the wearer’s name, photograph or role only where each serves a clear purpose. Information about authorisation, visitor handling or emergency procedures may be better explained in facility guidance than squeezed onto a card where it could be missed or misunderstood.
Review the design at the card’s actual size. Check that names and other approved wording are easy to read, the photograph is clear and the layout has enough space. A design that looks tidy when enlarged on a screen may feel crowded at its printed size. Check every side, then approve the final artwork only when the wording and images are correct.
Describe RFID/NFC printing accurately
RFID/NFC printing is listed for Photo ID & Conference Cards. This describes a printing option only. It doesn’t establish that a chip is encoded, that the card operates electronically or that it’s compatible with a particular access system. Keep the specification precise, and don’t promise access-system functions based on printed RFID/NFC details alone.
For ID badges for secure facilities, make the written specification as clear as the visual design. State the intended identification purpose, orientation, number of printed sides, approved details and whether you need a signature strip. This gives the artwork a defined brief and makes the final review more straightforward.
How to plan a secure-facility badge order
A short internal brief helps turn your identification requirements into a clear badge order. Before submitting it, agree who needs a badge, what each format should show and who can approve the wording and artwork. Settle these decisions within your organisation so the design reflects your procedures without being mistaken for an access credential.
- Identify the users. List the groups who need visible identification, such as permanent staff, contractors, temporary workers and visitors. Estimate quantities for each group and note any differences in their information needs.
- Choose the format. Decide whether each group needs a photo ID card, staff name badge or reusable name badge. Match the format to what people need to recognise and whether names are likely to change.
- Prepare the artwork. Gather the final approved logo, photographs and wording for the chosen design. Confirm orientation and whether the card needs one or two printed sides.
- Approve the details. Assign someone to check names, roles, images, spelling and layout. Review the artwork at its intended card size, including the reverse of a double-sided design.
- Place the order. Submit the agreed format, quantities and approved artwork. Keep a record of the specification so future replacements or additions can follow the same design.
Prepare artwork and approval responsibilities
Use the final logo version and artwork authorised by your organisation, rather than an old draft or a logo copied from a screen image. Check each name and other printed detail against your approved list. Decide who reviews the design and gives final approval before production begins. Make corrections at this stage, rather than relying on dispatch time for further design changes.
Plan for operational changes and replacement needs
Consider staff changes, contractor turnover and temporary identification needs when estimating quantities. If names change regularly, reusable name badges with replaceable inserts may suit that workflow. Don’t assume the same feature applies to photo ID cards, which are made to their own printed design. If a double-sided card suits your approved layout, compare the double-sided Photo ID Badges options.
Badge orders are generally dispatched within three working days. Timing depends on artwork approval and production, and delivery time is additional. Arrival dates aren’t guaranteed. If your facility has a required date, allow for these separate stages and submit approved artwork promptly.
Keep the approved specification and user list together. This makes it easier to order consistent replacements when staffing or identification needs change, while leaving access decisions to your facility’s separate rules and systems.
Choose an ID badge format with Imagin Products
Once you’ve decided what each badge needs to identify, match the format to that job. A photo ID card suits a design that needs to display a photograph alongside approved details. A name badge provides straightforward visible staff identification, while a reusable name badge can help where the displayed name changes. None should be treated as proof of access permission or a replacement for your facility’s separate access rules and systems.
At Imagin Products, our Photo ID & Conference Cards are available in single- and double-sided layouts, in portrait and landscape formats. These options let you plan the design around its approved content and intended display. A double-sided layout with a signature strip is also available as an option. Choose it if it suits the brief your organisation has agreed.
Match the card options to your approved brief
Use the brief to guide the format, rather than trying to make one card do every job. If the information fits clearly on one face, a single-sided layout may be suitable. If the approved design needs content on both faces, consider double-sided printing. Review portrait and landscape artwork at its intended size to see which orientation presents the details clearly.
RFID/NFC printing is listed for Photo ID & Conference Cards. It doesn’t mean a chip is encoded or that the printed card operates as an electronic access credential. Keep any access-control requirement separate from the printed specification, and don’t assume system compatibility based on RFID/NFC wording alone.
Make the final order straightforward
Bring the practical details together in one approved brief before placing an order. Confirm who needs each format, the quantities, final wording, image use, orientation and whether one or both sides will be printed. Check names and other details against your organisation’s approved information, then review the artwork at actual card size. A clear sign-off helps everyone work from the same version.
Our customer service is personal, and you can talk to us rather than machines. We can help you work through the card layout options and turn the agreed direction into a clear order. For more information about Imagin Products, visit our website.
Choose a format for visible identification, and keep access decisions with your facility’s separate procedures.
Put your badge specification into practice
Turn your agreed identification approach into a simple reference for the people who manage badges. Record who approves changes, how new starters or temporary workers are added, and when an existing design should be reviewed. This gives your organisation a consistent starting point as teams and site procedures change.
With the purpose settled, you can make choices about ID badges for secure facilities with greater confidence and keep printed identification aligned with the way your facility operates.
To discuss the right format for your order, explore our Photo ID Badges collection.
Frequently Asked Questions
Can an ID badge open doors by itself?
A printed name or photograph alone won’t operate a door. Record whether users need a separate credential and how it’s issued, updated or cancelled in a technical specification for the person responsible for access control. Keep that requirement separate from the badge artwork, and don’t assume the person approving the print design is also approving access permissions.
Is a photo ID badge enough to secure a facility?
No. Treat the card as one part of a wider facility process. Decide who checks identification, what they do if details are unclear and where they refer concerns. Assign responsibility for replacing worn or outdated cards, and make sure staff know how to request a correction. This helps keep the identification scheme useful as people and roles change.
Can visitor ID badges be different from staff badges?
Yes. Set approved wording or a consistent layout for each group, then keep a record of which version is issued to staff, contractors and visitors. Decide whether visitor wording should be prominent and whether contractor roles need to appear. Check each design at its final printed size and nominate someone to approve changes, so updated templates remain consistent across the facility.
What should we do if someone loses an ID badge?
Report a missing badge through your organisation’s established process, then have the responsible person decide what follow-up is needed. Record when it was reported and which badge details are affected. Before ordering a replacement, verify the name and photograph against approved records, and check that old artwork or details aren’t reused by mistake. Keep any separate credential administration with its designated owner.
Can RFID or NFC details be printed on a photo ID card?
Yes, RFID/NFC printing is listed for Photo ID & Conference Cards. Describe the visible print you want in the order brief and keep technical requirements in a separate document for the person responsible for the access system. This keeps artwork approval focused on the card’s appearance and avoids assumptions about technical setup.
How far ahead should we order facility ID badges?
Start planning when you know when the badges need to be in use. Set an internal cut-off for collecting names, reviewing the design and approving the final artwork. Badge orders are generally dispatched within three working days, depending on artwork approval and production, and delivery time is additional. Arrival dates aren’t guaranteed. For phased onboarding, decide whether to order one batch or plan later additions, and leave time for internal corrections.

Article by
Team Imagin :)
Team Imagin helps businesses look their best with quality name badges, photo ID cards, lanyards and branded workwear. Based in Kirkcaldy, Scotland, we combine friendly, personal service with professional printing and embroidery to bring your branding to life. From small teams to large organisations across Scotland, the UK, Europe and America, we help you boost your brand and build connections.
Disclaimer
This article provides general guidance only. Information was correct to the best of our knowledge when published, but product details, prices and regulations may change. Check current specifications and official guidance before making decisions.