
Bespoke Button Badges for Businesses and Events

Planning bespoke button badges means deciding on the design, quantity and delivery together. The right choices depend on what the badges need to communicate, who will wear or receive them, and when you need them. A business giveaway, event team identifier and fundraising badge may each call for a different approach.
Before ordering, consider the details that will shape the finished design. Decide how much wording to include, whether you need one design or several, and how the badges will be distributed. A suitable size and clear artwork help keep the message readable. Reviewing the order details also helps you plan with confidence.
This guide covers badge prices and delivery, preparing artwork, and choosing a size and print approach for your purpose. It also explains how to plan a rush order and use button badges for business activities, events and fundraising. Use these considerations to define your requirements before preparing a print-ready design.
Key Takeaways
- Allow for artwork approval and production when planning dispatch, and remember delivery time is additional.
- Review delivery charges, VAT and the final total at checkout before paying.
- Use the correct artwork template and check your design at actual printed size, especially small text.
- Choose a badge size and print approach that suit how the design will be seen and used.
- For a tight deadline, discuss rapid turnaround by phone rather than assuming next-day delivery is available.
Button badge pricing and delivery charges
The full cost of a button badge order depends on its size, quantity and selected options. Compare the same specification when assessing totals, since a different diameter or quantity changes what you’re buying. Delivery is calculated at checkout, so the product charge alone isn’t the final amount. Review your selected options, any applicable discounts, VAT, delivery charges and final total before paying.
Button badges have a printed design beneath a thin cover, pressed with steel parts. Handle the pin carefully, secure it properly when wearing the badge, and stop using it if the fastening is damaged. These are practical precautions for handling a sharp pin, not a statement about a specific badge safety regulation.
Imagin Products Ltd is a UK supplier of custom button badges, alongside other UK businesses that print promotional items. Suppliers’ manufacturing locations and delivery arrangements differ, so check whether their stated timing refers to production, dispatch or arrival. The distinction matters when you’re planning badges for an event date.
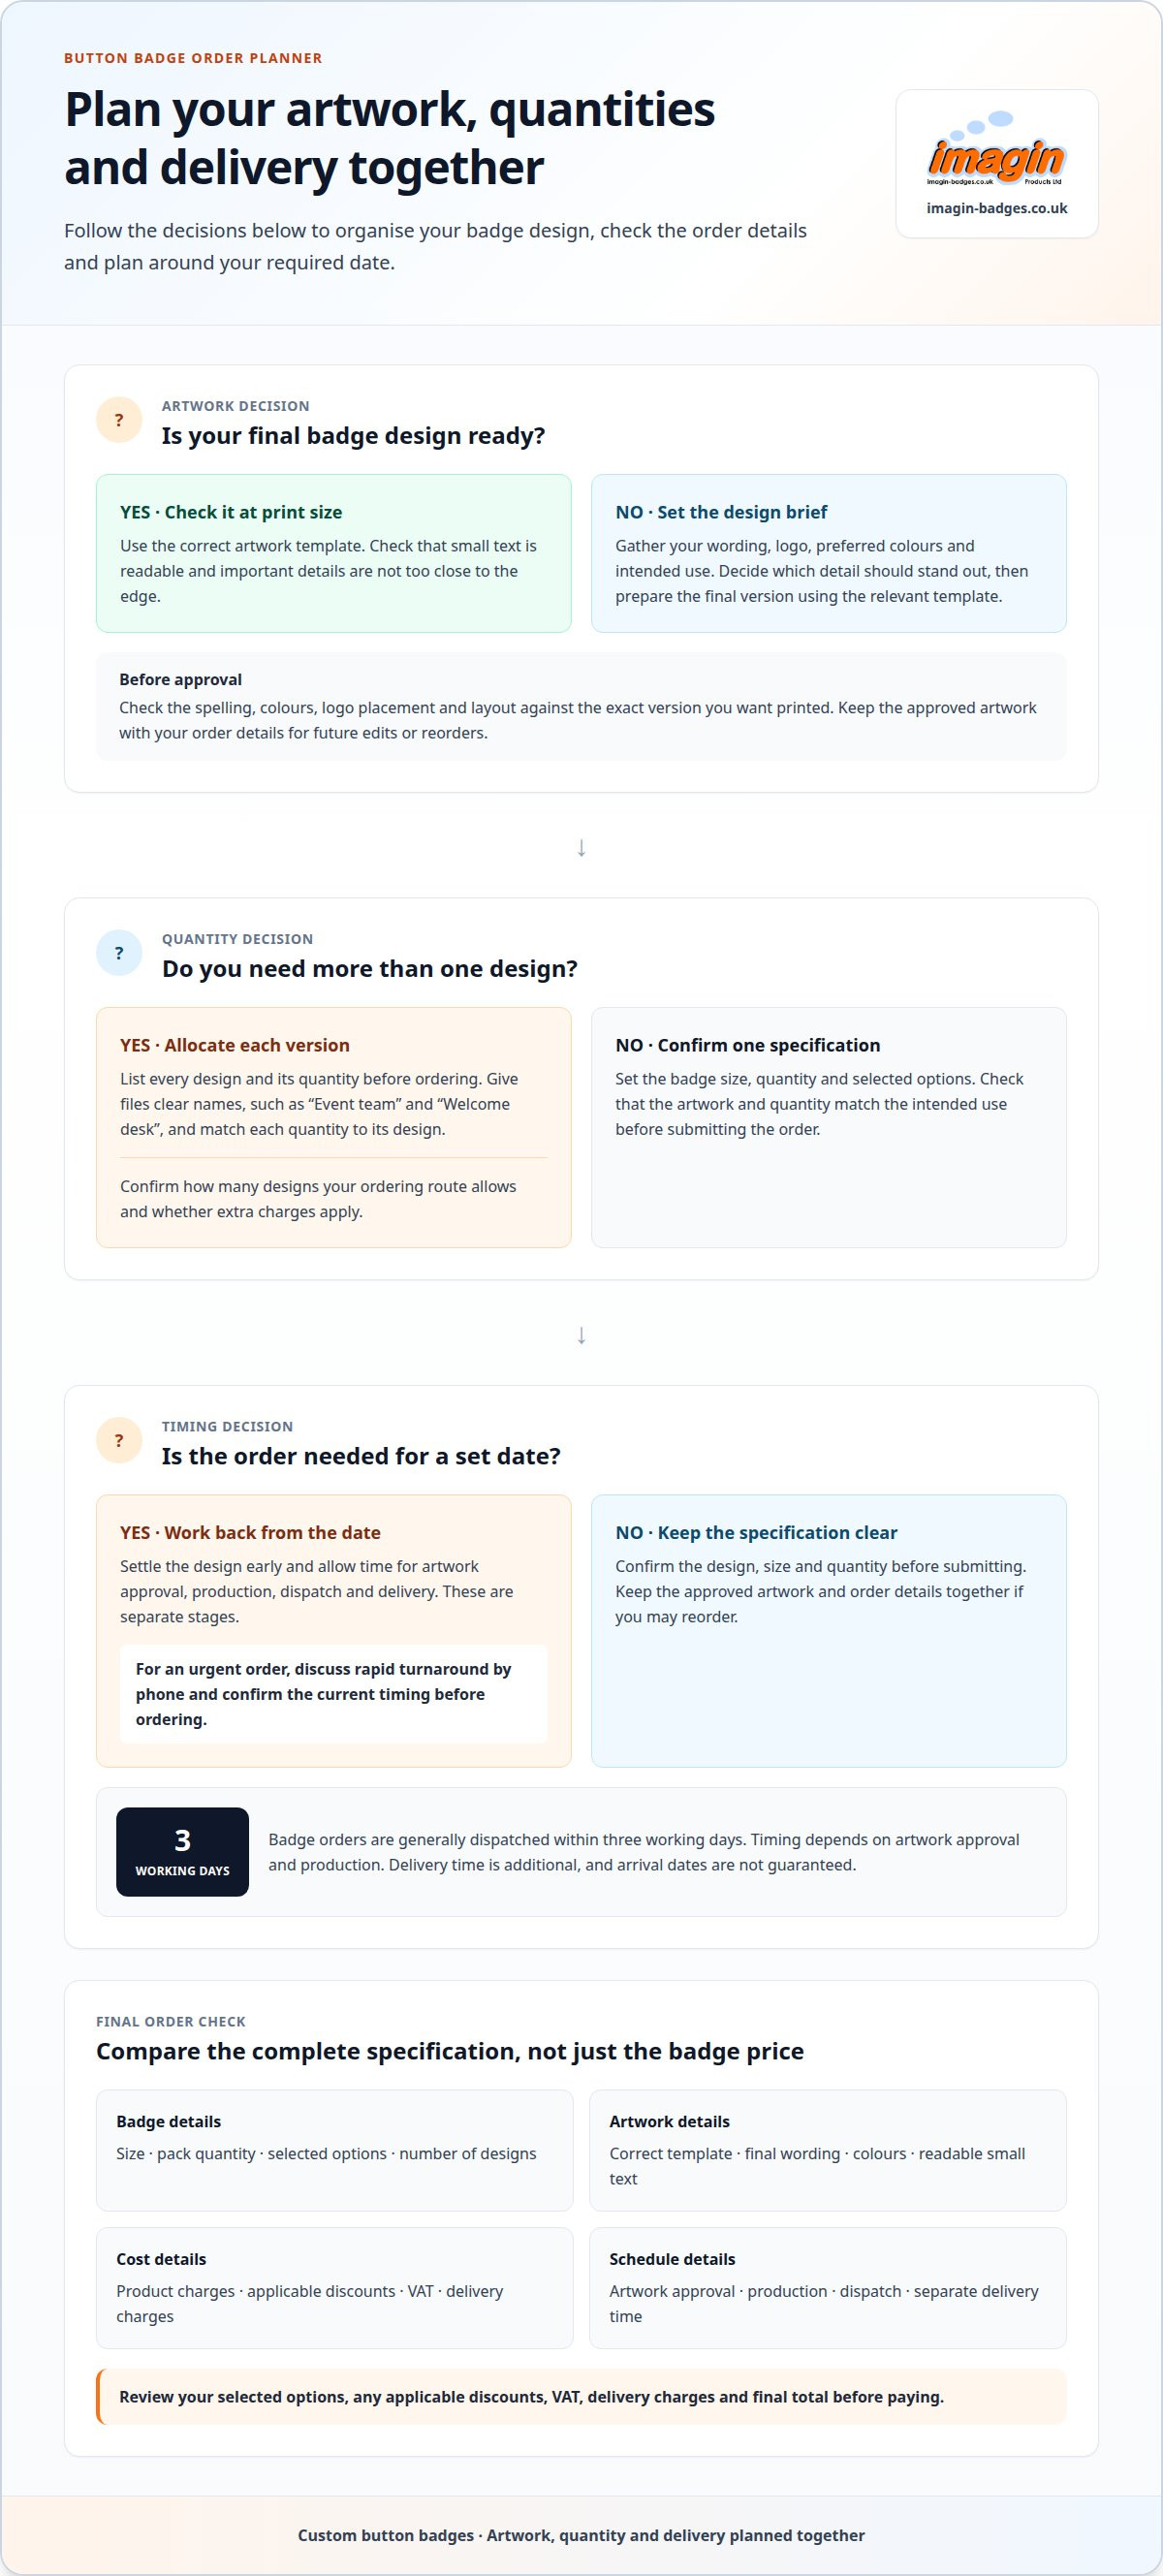
Badge orders are generally dispatched within 3 working days. Delivery time is additional. Next-day delivery applies after dispatch, not after ordering. Allow time for artwork approval and production before dispatch, then include the delivery stage in your schedule. See Imagin's shipping policy for details. For a fixed event date, settle the design early and avoid leaving approval until the last moment.
Shipping is calculated at checkout, separately from the product charge. Review the basket for product charges, bulk-pricing discounts and any selected options, then check the final amount, including VAT and shipping, before ordering. Comparing complete totals for matching specifications gives you a clearer picture than comparing a badge price alone.
Express orders, reordering and quality checks
If your event is approaching, have the date, quantity and artwork status ready when discussing an urgent order. For urgent orders, confirm the available turnaround and delivery timing before placing your order. Production and delivery are separate stages, so plan for both. A clear deadline and approved design help define the next steps.
Before approving the artwork, check the wording, colours, logo placement and finish against your intended design. Keep the approved artwork and order details together for repeat orders. When reordering, compare the new size, quantity and design with your previous specification, as changes can affect the total.
For a first order, decide which details need to stay consistent, such as a campaign logo or event name. For a repeat order, use the previous design as a reference and review the current specification. This gives you a practical basis for planning the next print run and delivery around your schedule.
Online badge design and print-file uploads
Artwork requirements depend on the supplier and ordering route, so use the template provided for your chosen badge. Check the design at actual printed size, keep small text readable, and prepare the final version before submitting it.
Online Design Tools and Artwork Uploads
Some ordering routes provide a design tool, while others allow you to upload finished artwork. A tool can help position text and images in the badge layout; an uploaded file gives you more control over the design beforehand. Follow the instructions for your selected order and don’t assume every printer uses the same system.
Ask us for the correct template before preparing your final button badge artwork. Use it to position the logo and wording, then view the design at its actual printed size. Check that small text is legible and important details are not too close to the edge. A design that looks clear when enlarged on screen can feel crowded on a small badge.
Multiple Designs and Additional Charges
Order systems handle multiple designs differently. Confirm the number of designs allowed and any additional charges with Imagin. If your order includes separate artwork for staff, volunteers or event teams, list each design and its quantity before starting. This helps you select the right ordering route and allocate badges accurately.
Additional designs can affect the total, depending on the route and its terms. Review the design count and any extra charges presented during ordering before paying. Give files clear names, such as “Event team” and “Welcome desk”, and match each quantity to its design. This simple naming step helps prevent artwork being assigned to the wrong group.
Design Support and Artwork Ownership
Design support can help when you have a logo but haven’t settled on a layout. Prepare the wording, logo, preferred colours and intended use, then explain which detail should stand out. A fundraiser badge, for example, might prioritise its campaign message, while a business badge may lead with the organisation’s logo. A focused brief helps shape the design without overcrowding it.
Submit artwork you’re entitled to use, including any logo or image supplied by another organisation. Keep the original file and approved design together for future edits or repeat orders. Before approval, check names, spelling, colours and layout. Approve the exact version you want printed, not an earlier draft.
Upload and Ordering Process
Choose the badge specification, then prepare your artwork using the relevant template. Submit the final design through your selected order route, enter the quantity for each version, and review the order details. If the route allows artwork submission after purchase, follow its stated deadline, as the process can vary.
Review any proof or design preview against your original file before approving it. Check wording, colours, image placement and small details at actual printed size. Then retain the approved artwork with your order details. A tidy record makes a later reorder easier to set up and helps keep the design consistent. You can use our badge ordering options as a starting point for preparing your project.
Custom badge sizes and order quantities
Bespoke button badges have a printed design beneath a thin cover, pressed with steel parts. The finished badge combines the printed face and backing, so its size affects the artwork area and how clearly details show. Choose a diameter that suits the viewing distance and amount of information.
Round formats include 25 mm, 38 mm, 59 mm and 77 mm options. A larger face gives a design more room, whilst a smaller badge suits a compact logo or short message. Compare the actual diameter, not just the product image, before choosing.
Order quantities, proofs and prices
Check the minimum order and available quantities for your chosen size. If you need several designs, decide how many badges you need for each one first. This helps you avoid ordering the wrong mix.
For a digital proof, inspect the badge face at its intended size. Check spelling, logo placement, colour and any fine detail before approval. A screen preview helps assess layout, but the physical badge has a curved edge and cover. Keep key text and artwork away from the outer edge.
Popular order totals depend on diameter, quantity, delivery choice and the number of designs. A larger quantity changes the total order cost. Compare the complete payable amount for the exact specification, rather than relying on an isolated price per badge.
Choose a size around the design
For a short event name or simple emblem, a compact 25 mm badge keeps the design focused. A 38 mm face provides more space for larger lettering or additional visual detail. A 59 mm design offers a broader canvas, but the artwork still needs a clear hierarchy to remain easy to read.
Set the size first, then scale the artwork to match. Check small text at actual printed size, and avoid crowding the edge with logos or wording. Finally, include delivery when planning arrival.
Badge printing resolution and colour
Clear button badge artwork starts with a good source file and a design prepared for its final size. Enlarging a small, blurry logo won’t restore its detail. Check the design at its intended printed size before approval, especially if it includes small lettering, fine lines or a detailed image.
The right level of detail depends on the artwork and badge size. A simple logo and a detailed image have different needs. Look closely at lettering edges, small shapes and thin outlines in the proposed layout. If they’re unclear at badge size on screen, they’re unlikely to become easier to read when printed.
Artwork colour formats
Artwork can use different colour modes, including RGB and CMYK. RGB is commonly used for screen displays, while CMYK is associated with print processes. Colours on screen can differ from the printed result, so treat an on-screen preview as a guide rather than an exact match.
For a brand colour, provide its reference with the artwork. A colour code gives the printer a clearer target than a description such as “dark blue”. If your logo has a background, decide whether it should remain in the design or be removed. Check how transparent areas appear against the intended background.
Use the correct artwork template for your chosen badge size. It shows where the printed face sits and helps you keep important details away from the edge. Ask us for the relevant template before preparing the final file. Don’t stretch a logo to fill a circle, as this can distort its lettering and proportions.
Full-colour printing
Button badges support full-colour printing, including designs with several colours, gradients or photographic detail. You can prepare the design for its intended appearance rather than reducing the palette.
More colour doesn’t automatically make a badge clearer. A crowded design can be difficult to read, particularly at a smaller diameter. Give the main logo or message priority, then remove details that don’t help identify the organisation, event or campaign. A short event name, for example, may be easier to read than a long slogan in tiny type.
Before submitting the artwork, compare the preview with the original file. Check spelling, colour references, contrast and placement. Then view it at its intended printed size, not only enlarged on a screen. Keep the approved version and template together so future changes start from the same clear design.
Button badge affordability and uses
A suitable budget starts with a clear purpose. For a charity fundraiser, decide whether each badge is a giveaway, a volunteer identifier or a supporter item. These roles may need different artwork or quantities. List each design and its intended recipient before ordering, so the specification reflects how the badges will be used.
To compare costs, divide the full payable total by the number of badges ordered. Include VAT and shipping in the total before calculating the cost per badge. If checkout applies a discount, include that too. This gives you a more useful comparison than looking at the product charge alone.
Plan quantities around distribution, not just expected event attendance. A conference may need badges for delegates, speakers and staff, while a shop promotion could give them to customers. Estimate each group separately, then combine quantities only when the artwork is identical. Separate designs can distinguish roles, but each needs its own planned quantity.
- For a fundraiser: choose a short message supporters can recognise and wear.
- For a conference: use distinct artwork to identify speakers or organising staff.
- For a business campaign: align the badge message with a specific launch or event.
A simple design may work better on a small badge face than a slogan packed with detail. Keep the main message, logo or symbol prominent, and remove wording that doesn’t explain the badge’s purpose. For a multi-day event, settle on one approved design before ordering to avoid splitting the order between versions that differ only in minor wording.
Consider whether badges will be kept, handed out or used for one occasion. A campaign design may suit repeat events, while a dated design can be appropriate for a specific gathering. Avoid ordering extra quantities without a distribution plan. Estimate recipients, allow a practical reserve for late registrations, then choose quantities that fit.
A clear budget decision starts with the intended use: define the audience, settle the artwork, count each design and compare the full payable total. The product price alone won’t show the full outlay once VAT and shipping are included. Compare orders using the same quantity, design count and shipping requirements.
Imagin Products: Standard Name Badges
Imagin Products Ltd helps organisations choose identification that fits their staff or event. If your priority is displaying team members’ names, explore our Standard Name Badges. Premium Name Badges offer another option, while Reusable Name Badges suit teams that need to change displayed names. For delegates and visitors, Conference Badges support event identification.
Choose based on what people need to see and whether the names will change. A fixed staff team may suit standard name badges, while changing names or event details may call for a reusable format. If you’re unsure which option fits, our team can help you think through the use and design.
Explore the bespoke button badges and other options at imagin-badges.co.uk and choose a size and design for your project.
Turn your badge idea into a finished design
Give your badges a clear purpose before settling on the artwork. A campaign badge might carry one memorable message, while an event design could help people show their involvement. Keep the main idea visible at the chosen size, and make sure each design serves its wearer.
If you need to display staff names rather than a shared message, Imagin Products offers Standard Name Badges, Premium Name Badges and Reusable Name Badges. These options support workplace identification, depending on whether names stay fixed or need to change.
Gather your final artwork, intended quantity and preferred size before taking the next step. With those details ready, you can plan bespoke button badges around their purpose, whether they’re for an event, business or community group.
Start with one simple question: what should someone understand when they see the badge? Build the design around that message, and your idea is ready to take shape.
Frequently Asked Questions
What custom sizes, shapes and finishes are available for button badges?
Button badges are available in four diameters: 25 mm, 38 mm, 59 mm and 77 mm. The printed design provides the personalised face, with a standard pin fixing. Choose a diameter around the amount of artwork and wording you need to show. Keep important details clear at the finished size, especially if your design includes a logo and small lettering.
What is the minimum order quantity for bespoke button badges in the UK?
Contact Imagin to confirm the minimum order quantity for your chosen badge size.
How much do custom button badges cost in the UK by quantity and size?
The total depends on badge size and quantity, with shipping calculated separately at checkout. A different size or order quantity changes the specification, so compare the full total for the combination you need. Include shipping in your budget and review the checkout total before paying. This gives you a useful figure for planning a staff campaign or event distribution.
How long does production and UK delivery of custom button badges take?
Badge orders are generally dispatched within 3 working days. Delivery time is additional. Dispatch means the order has left for delivery, not that it has arrived, and shipping is calculated at checkout. For an event, work backwards from the date badges are needed and leave time for artwork preparation and approval before production. If the event date is fixed, avoid leaving design decisions until the final stage.
Which badge fastenings are available, and how do they compare?
The standard fixing is a pin, which fastens through clothing. Consider the garment, wearer and setting before choosing. For example, someone wearing delicate clothing may prefer to avoid pin holes. Choose the fixing that suits each intended use.
Are button badges suitable for events, promotions and fundraising?
Yes. A shared design can help event teams, volunteers or supporters display a campaign message or organisation logo. Fundraisers can distribute badges to supporters; conference organisers can use them to identify their team. Keep the message brief enough to read at the chosen size, and plan quantities around who will receive each design. Button badges complement event identification, but don’t replace name or photo ID when those are needed.
Which UK suppliers make custom button badges?
Imagin Products Ltd and Banana-Print make custom button badges in the UK.
Article by
Team Imagin :)
Team Imagin helps businesses look their best with quality name badges, photo ID cards, lanyards and branded workwear. Based in Kirkcaldy, Scotland, we combine friendly, personal service with professional printing and embroidery to bring your branding to life. From small teams to large organisations across Scotland, the UK, Europe and America, we help you boost your brand and build connections.
Disclaimer
This article provides general guidance only. Information was correct to the best of our knowledge when published, but product details, prices and regulations may change. Check current specifications and official guidance before making decisions.