
Badge Fixings Compared for Fit, Use and Durability

There isn’t one fixing that’s best for every badge. Choosing the right badge fixing depends on the badge’s size and construction, the clothing or surface it needs to attach to, and how often it will be worn or moved. The best option balances a secure fit with comfort, fabric care and the level of durability you need.
It’s easy to focus on how a fixing attaches, but the garment and wearer matter just as much. A choice that works well on a lightweight shirt may be less suitable for a thick coat, delicate fabric or a badge that needs to move between outfits. Each option has trade-offs, so it helps to consider how the badge will be used day to day.
This comparison explains the practical differences between common fixing types, including how they attach, where they work well and what to consider for everyday wear. You’ll also see how cost, attachment method and durability affect the decision, so you can narrow down a fixing that suits your badge and its intended use.
Key Takeaways
- Match the fixing to the badge’s size and weight, the garment or surface, and how often it will be worn or moved.
- Choose between pinning, clipping, sewing or a backing based on the attachment you need and the fabric you want to protect.
- Consider how repeated wear, washing and catching on clothing or bags could affect the fixing’s durability.
- A combination crocodile clip and safety pin offers two ways to attach a badge, which can suit temporary staff, visitors and conferences.
- Butterfly clutches are compact for regular badge wear, but consider whether their small size and potential to catch on straps or linings suit the wearer.
Choosing a fitting or backing to suit the product and its intended use
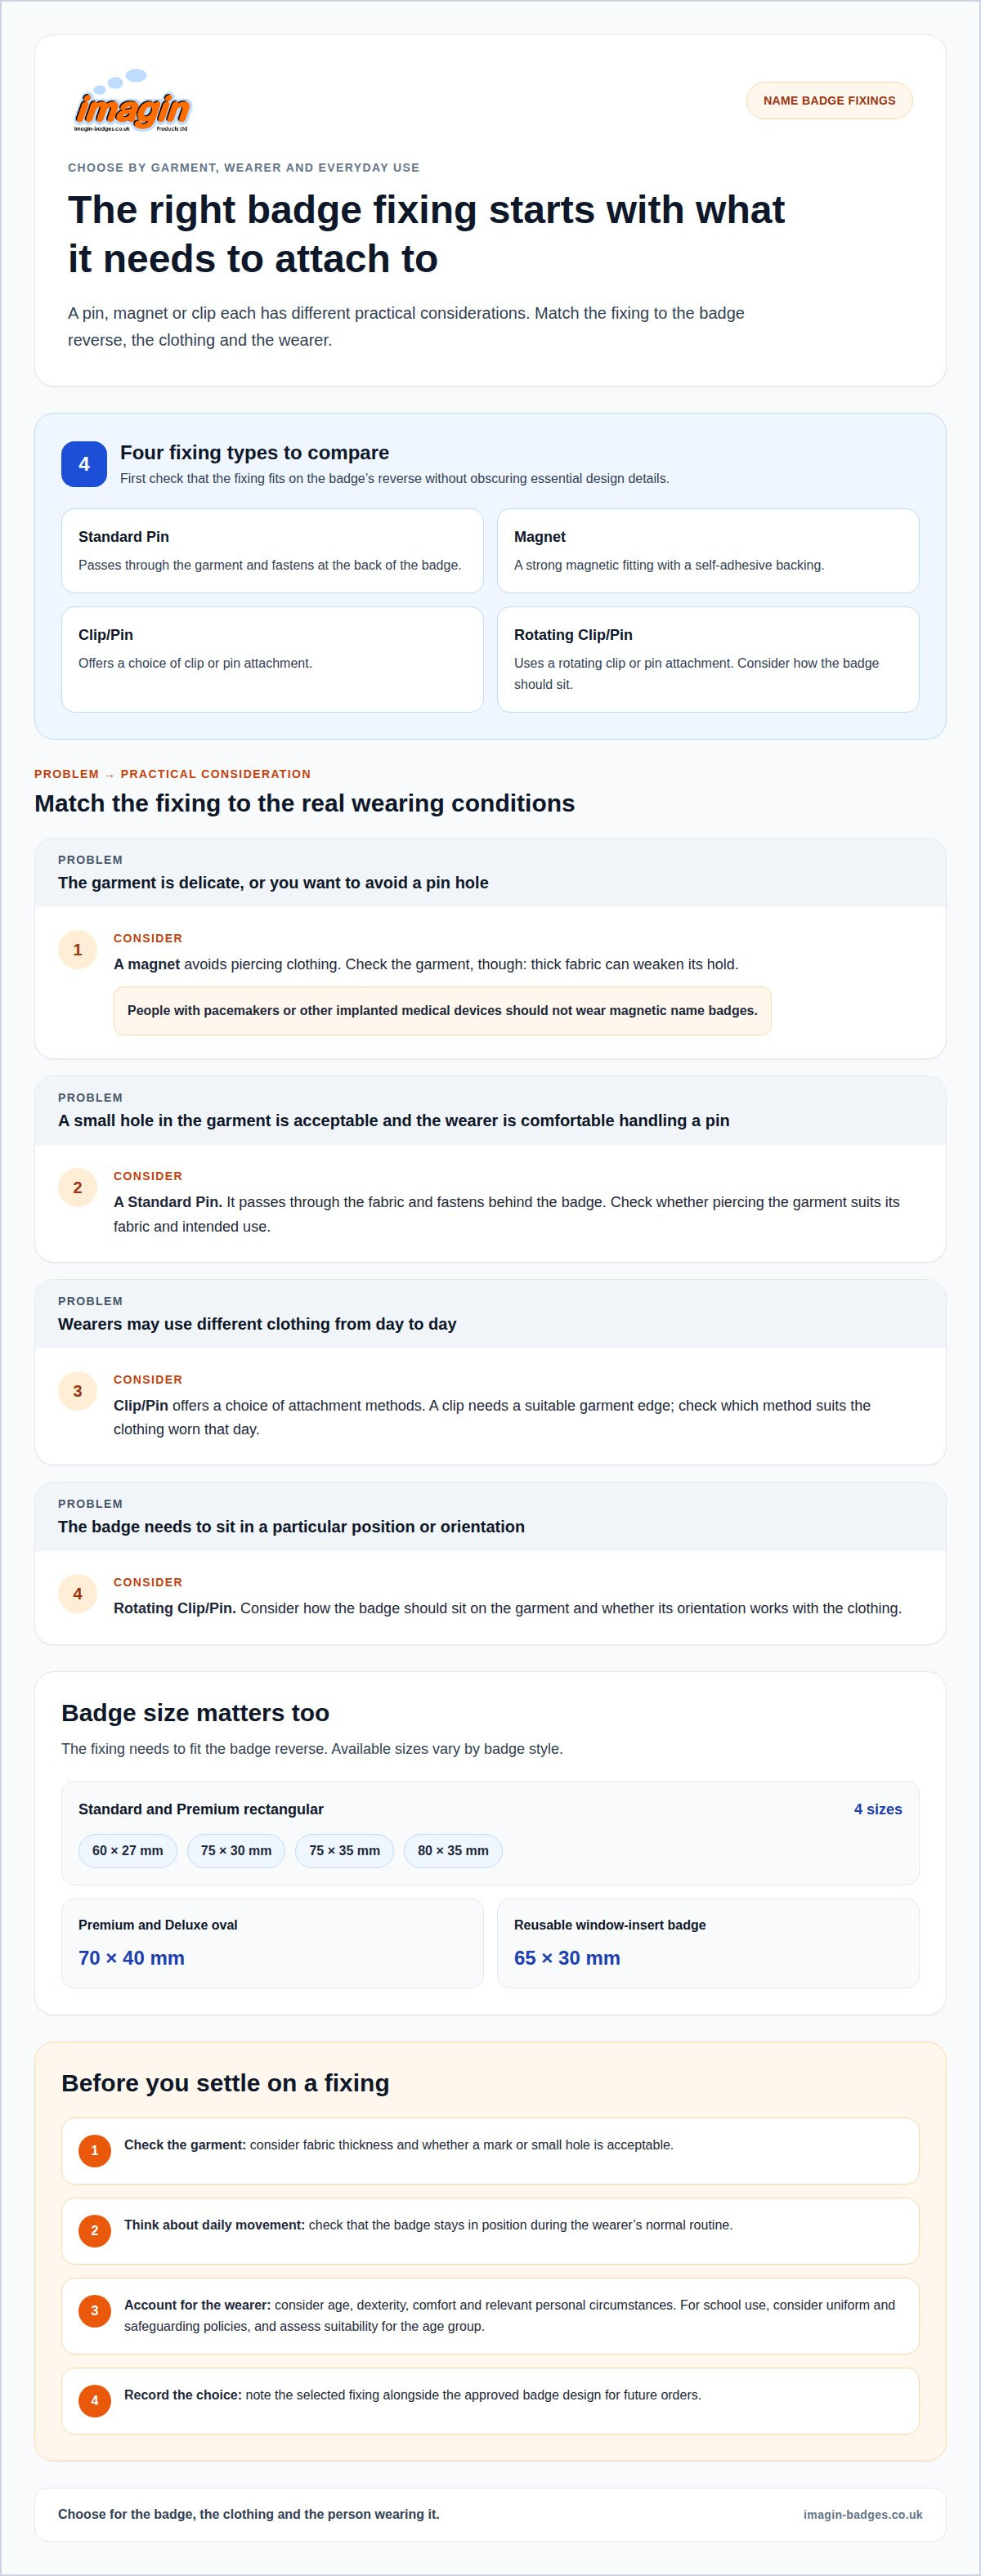
Choose a name badge fixing by considering the badge, the clothing it will be worn on and how the wearer will attach it. The available fixing types are Standard Pin, Magnet, Clip/Pin and Rotating Clip/Pin. Match the attachment method to the garment and how the badge will be used.
UK name badge sizes depend on the badge style. Standard rectangular badges are available in 60 × 27 mm, 75 × 30 mm, 75 × 35 mm and 80 × 35 mm sizes. Premium rectangular badges share those dimensions. Premium and Deluxe oval badges measure 70 × 40 mm, while the reusable window-insert badge measures 65 × 30 mm. A fixing needs to fit the badge’s reverse without obstructing its design.
| Fixing | Attachment method | Useful consideration |
|---|---|---|
| Standard Pin | Attaches through clothing | Consider whether piercing the garment suits its fabric and use |
| Magnet | A strong magnetic fitting with a self-adhesive backing | Consider the garment and the wearer’s circumstances |
| Clip/Pin | Offers a clip or pin attachment | Consider which method suits the clothing worn that day |
| Rotating Clip/Pin | Uses a rotating clip or pin attachment | Consider how the badge should sit on the garment |
Choose a fixing that suits both the badge’s reverse and the wearer’s clothing, rather than selecting by badge face alone.
Safety and wearer needs matter. For a school, consider uniform and safeguarding policies, then assess the badge for the age group using it. A detachable pin badge may not suit younger pupils. Consider the wearer’s dexterity and whether they can attach and remove the fixing comfortably. People with pacemakers or other implanted medical devices should not wear magnetic name badges.
Fabric affects the practical choice. A pin passes through the garment, so consider whether that is suitable for a delicate shirt or uniform. A magnet avoids piercing clothing, but thick fabric can weaken its hold. With a clip or rotating clip, check that the garment has a suitable edge and that the badge stays in position during normal movement.
- Check the badge reverse: confirm the fixing can sit without obscuring essential design details.
- Consider the garment: compare the attachment method with fabric thickness and whether marks are acceptable.
- Think about daily use: consider whether the badge stays in place as the wearer moves through their routine.
- Assess the wearer: account for age, dexterity and any relevant personal circumstances.
When choosing a fixing, match the badge and its backing to the clothing, wearer and setting. A school uniform, delicate blouse and thick jacket each call for a different practical assessment. This helps you narrow the options and create a clear specification for your badge order.
Badge sewing and attachment options
Name badge fixings provide attachment options without sewing the badge onto clothing. The available types are Standard Pin, Magnet, Clip/Pin and Rotating Clip/Pin. Compare how each meets the garment with the wearer’s clothing and daily routine before ordering.
A Standard Pin passes through the garment and fastens at the back of the badge. Position the badge, pass the pin through the fabric and secure it. To remove it, release the fastening before withdrawing the pin. Consider this option when a small hole in the garment is acceptable and the wearer is comfortable handling a pin.
The Magnet option uses a magnetic fitting with self-adhesive backing. Position the badge on the garment and remove it carefully, without tugging the fabric. People with pacemakers or other implanted medical devices should not wear magnetic name badges. A clip or pin may be a more suitable choice for those wearers.
Clip/Pin and Rotating Clip/Pin offer a choice of clip or pin attachment. With Clip/Pin, select the method that suits the garment. For Rotating Clip/Pin, consider how the badge should sit and whether its orientation works with the clothing. Follow the supplied fitting instructions when attaching or removing either type, taking care not to catch the fabric.
There isn’t one fixing that suits every garment. A team wearing lightweight shirts, jackets and different uniform layers should consider how each option works with its clothing. A pin passes through fabric, a clip needs a suitable edge and a magnet avoids a pin hole. If wearers change garments during a shift, consider how easily the fixing can be removed and repositioned.
Before choosing, make a simple attachment plan for the order:
- List the garments: note whether wearers use shirts, jackets or several clothing layers.
- Choose the method: select Standard Pin, Magnet, Clip/Pin or Rotating Clip/Pin to suit the planned wear.
- Consider the wearers: account for personal circumstances, comfort and ability to manage the fitting.
- Set a consistent specification: record the selected fixing alongside the approved badge design for future orders.
This keeps the attachment decision connected to real use, rather than treating it as a finishing detail. For staff name badges, choosing the right badge fixing means considering the garment, wearer and how the badge will be attached and removed during the working day.
Balancing fitting cost with durability
Compare the complete badge specification rather than choosing a fixing on its own. The badge material, finish, fastening and expected routine all affect suitability. Imagin Products Ltd's Standard Name Badges use printed aluminium with a clean finish. Premium Name Badges use aluminium with a domed resin coating, while Deluxe Name Badges have a full-colour domed resin finish with a black frame. Consider the finish alongside how the badge will be worn.
Durability depends on more than the badge face. Think about repeated handling, clothing changes and where the badge is kept between shifts. A badge taken off at the end of each day has a different routine from one left attached to a uniform. Match the fixing to that routine, then consider whether the badge's surface and edges will be handled carefully during removal and storage.
The available name badge fixings are Standard Pin, Magnet, Clip/Pin and Rotating Clip/Pin. They use different attachment methods, but there is no basis for assigning a separate cost or lifespan to each. Compare the full product specification and the options shown for the badge you're considering. Don't assume a particular fixing will cost less or last longer without product-specific information.
Washing also affects the decision. A badge attached to a regularly washed garment will need to be removed and reattached as part of the routine. Consider whether the wearer can do this without pulling at the badge or fabric. Follow the garment's care instructions and don't assume one finish or fixing suits every cleaning method.
Use this checklist to compare options for your team:
- Identify the routine: note whether the badge is removed daily, worn for a short event or kept with one uniform.
- Choose a finish: compare printed aluminium, aluminium with domed resin, and a full-colour domed resin finish with black frame.
- Review the fixing: compare Standard Pin, Magnet, Clip/Pin and Rotating Clip/Pin against the wearer's clothing and attachment routine.
- Consider name changes: a Reusable Name Badge has a window insert, which can be changed when the displayed name needs updating.
- Check care needs: account for garment washing and badge removal, then follow the care instructions for both.
For a staff uniform, standardising the badge material, finish and fixing gives your organisation a clear specification for future orders. If staff names change, a reusable window-insert format addresses that need. Compare these practical requirements, then choose a badge and fixing that suit the intended use.
Combination crocodile clip and safety-pin fixings
A Clip/Pin fixing offers a choice of clip or pin attachment. Compared with a pin, a clip can attach to a suitable garment edge; a magnet avoids piercing fabric but relies on magnetic hold. Each method needs to suit the garment and badge.
For a clip, open it, place it over a suitable clothing edge and release it to grip. For the pin option, pass the pin through the garment and secure it. To remove either fixing, detach the clip from the edge or release the pin before lifting the badge away.
This flexibility can suit temporary staff, visitors and conference delegates. For example, a delegate wearing a jacket with a suitable lapel edge could use the clip, while someone wearing a shirt without one could use the pin. The organisation can choose one badge format while letting each wearer select the attachment that suits their clothing.
Check the badge’s reverse layout before selecting a combination fixing. A clip and pin need space behind the design, so inspect the finished artwork and any enamel details against the fitting position. The attachment should not cover important wording or make the badge sit at an awkward angle. A broad badge may need careful positioning so its weight does not pull one point of fabric down.
For delicate fabric, a clip avoids making a pin hole but still grips the garment edge. Test it on the actual fabric to check that it holds without crushing or snagging it. A pin makes a small hole, so it may be unsuitable where marks matter. A magnet also avoids pin holes, but people with pacemakers or other implanted medical devices should not wear magnetic name badges.
Use this practical check before choosing for an event or workplace:
- Inspect the garment: identify a suitable edge for the clip, or an area where a pin hole is acceptable.
- Try both attachments: check that the badge stays in place during ordinary movement and remains easy to remove.
- Review the reverse: make sure the clip and pin do not obstruct the artwork or interfere with how the badge sits.
- Consider the wearer: select an option they can attach and release comfortably, particularly for short-term conference use.
A Clip/Pin fixing offers a choice, not a guarantee that both methods suit every garment. For an event badge worn with different outfits, the clip-and-pin options can offer practical flexibility. For a delicate blouse or thick coat, test the intended attachment on that garment before distributing badges to the group.
Butterfly clutches for everyday badge wear
A butterfly clutch is a compact fastening for a post-backed badge. Its two spring-loaded wings press against the post to hold the badge against clothing. This fitting is commonly used for regular wear on lapel badges, club pins, event badges and promotional designs.
To attach one, pass the badge post through the garment, then press the clutch onto the exposed post until it grips. To remove it, pinch the clutch wings together and pull it off before withdrawing the post. This routine suits wearers who can handle the small fitting comfortably.
A butterfly clutch is compact and cost-effective, but it isn’t the right choice for every badge or wearer. It can come loose if it catches on a bag strap, coat lining or other clothing. Check how the badge sits under a jacket or near a shoulder strap, then test the fastening during ordinary movement before ordering a larger batch.
Size and weight matter too. A small lapel badge with one post is a natural match for a butterfly clutch. A larger or heavier badge puts more strain on its attachment point, so consider a brooch safety-pin fitting or another suitable backing instead. For a wide design, two posts can help reduce rotation and keep the badge sitting flat.
Think about who will use the badge. Small clutch wings can be fiddly for very young wearers or people with limited dexterity. A larger safety-pin mechanism may be easier to handle, though it pierces the fabric and needs careful fastening. If a team wears badges daily, try the fastening with the actual uniform, including any commonly worn coat or bag.
Use these checks when assessing a butterfly clutch:
- Match post and clutch: confirm the clutch fits the badge post and holds it firmly.
- Test the garment: attach the badge to the intended clothing and check whether the post sits comfortably.
- Check snag points: move the badge near coat linings and bag straps to see whether they catch.
- Try removal: ask a wearer to release the clutch, especially if they have limited dexterity.
- Assess the badge: consider a different fitting if the design is broad, heavy or rotates on one post.
For everyday wear, a butterfly clutch offers a neat, familiar fastening when the badge is light enough and the wearer can manage its small parts. If clothing layers, snags or badge weight create problems, choose a fixing suited to those conditions rather than relying on a standard option.
For staff badges, compare the badge style and fastening with the clothing your team wears each day.
Imagin Products: Standard Name Badges
Imagin Products offers Standard Name Badges for teams that need clear, consistent staff identification. Once you’ve considered where the badge will be worn and how it should attach, choose a badge style that suits your organisation and design.
The range also includes Premium Name Badges, Reusable Name Badges and Conference Badges. Reusable badges suit teams that need to change the displayed name, while Conference Badges support delegate identification at events. Choose according to how the badge will be used and whether its information needs to change.
Explore our Standard Name Badges to consider the next step for your team. If you’d like help with your order, contact Imagin Products.
Set your badge specification before ordering
Treat choosing the right badge fixing as part of a clear ordering specification, rather than a last-minute decision. Record the intended wearer, where the badge will be used, the selected attachment and who approves the final design. This gives colleagues a shared reference when new starters join or future orders are needed.
Before confirming a larger rollout, have a small group try the proposed badge with their usual clothing and work routine. Gather feedback on comfort, attachment and whether the badge stays in position. Use that feedback to finalise the specification, then keep it with the approved artwork so the next order starts from a consistent brief.
A clear specification helps turn an initial idea into badges suited to your team’s day-to-day needs. If you’re ready to develop your design, Imagin Products can help with the next step.
Frequently Asked Questions
Which fixing is best?
The best fixing is the one that suits the badge, garment and wearer together. For a lightweight lapel badge, a pin and clutch can be straightforward; for delicate clothing, a magnetic option avoids piercing the fabric. A clip can suit temporary event wear where clothing has a suitable edge. Compare how secure it feels during normal movement, how easily it comes off, and whether the wearer can manage it.
Which badge fixing is best for clothing, bags, uniforms or hard surfaces?
For clothing, choose a fastening that suits the fabric and how often the badge is worn. A pin can work on a uniform, while a magnetic fitting avoids a hole in delicate fabric. A rubber clutch can suit a badge attached to a bag or cap. Hard surfaces need a fixing intended for that surface, rather than a garment pin. Check the badge’s intended attachment before applying it.
Can magnetic badge fixings damage phones, cards or medical devices?
Keep a magnetic badge fitting separate from magnetic-stripe cards, and follow device makers’ advice for phones and other electronics. People with pacemakers or other implanted medical devices should not wear magnetic name badges. If a wearer uses an implanted device, choose a non-magnetic fixing. Compatibility varies by device and card type.
Which badge fixing is safest for children and delicate fabrics?
There isn’t one safest fixing for every child or fabric. For younger pupils, a detachable pin badge may not suit the school’s age group or safeguarding policy. A magnetic fitting avoids piercing delicate fabric, but it isn’t suitable for people with pacemakers or other implanted medical devices. Consider the wearer’s age, dexterity and clothing, then assess the badge during normal use.
How much do different badge fixings cost in the UK?
There isn’t one UK price that applies to every fixing. The total depends on the badge selected and its available fastening options, so compare the complete specification rather than assuming an attachment has a standard price. Imagin Products’ website shows product charges and options during ordering. Review the chosen badge and fastening together before placing an order, and check the final amount at checkout.
Are there UK safety or accessibility considerations when choosing badge fixings?
Yes. Consider the wearer’s age and dexterity, clothing, and workplace or school policies. A small clutch can be difficult for someone with limited dexterity, while a detachable pin badge may not suit younger pupils. Magnetic name badges are unsuitable for people with pacemakers or other implanted medical devices. These factors help organisations choose a fixing suited to their wearers and setting.
What badge fixing sizes and materials are available from UK suppliers?
UK name badge sizes include rectangular badges measuring 60 × 27 mm, 75 × 30 mm, 75 × 35 mm or 80 × 35 mm; oval badges at 70 × 40 mm; and reusable window-insert badges at 65 × 30 mm. Badge constructions include printed aluminium, aluminium with a domed resin coating, and a full-colour domed resin finish with a black frame. Available fixings include Standard Pin, Magnet, Clip/Pin and Rotating Clip/Pin.
Article by
Team Imagin :)
Team Imagin helps businesses look their best with quality name badges, photo ID cards, lanyards and branded workwear. Based in Kirkcaldy, Scotland, we combine friendly, personal service with professional printing and embroidery to bring your branding to life. From small teams to large organisations across Scotland, the UK, Europe and America, we help you boost your brand and build connections.
Disclaimer
This article provides general guidance only. Information was correct to the best of our knowledge when published, but product details, prices and regulations may change. Check current specifications and official guidance before making decisions.